Before installing CxSAST, make sure that you understand the System Architecture, that your server host(s) complies with the server host requirements, and that you have properly prepared the installation environment.
Prior to installing CxSAST, if not already installed on the server host, install the following prerequisites, which are included in the installation zip file (“third party” folder):
- IIS (Windows 7 or greater) - see the OS-specific instructions (IISInstallationProcess.rtf file)
- MS SQL
- VC++ Runtime Redistributable
For more information, see server host requirements.
| Info |
|---|
If you are interested in configuring a High Availability solution please contact Checkmarx support. |
| Info |
|---|
If your portal is installed on a separate machine from manager, please perform the following procedure. |
Installation Permissions
The user performing the installation must have administrative network permissions (user name and password) for the computer/server running CxSAST Services.
| Info | ||||
|---|---|---|---|---|
| ||||
If the database uses Windows domain authentication, the machine with the product installed on it must be added to a Windows domain. In addition, the user account performing the installation (Centralized or CxManager) must have SA permission on the database server for the duration of the installation process. If SA permission is unavailable, certain prerequisites must be fulfilled prior to the installation:
If the database uses SQL Server native authentication, prepare an SQL Server user account. This account must have SA permissions for the duration of the installation process. If SA permission are unavailable, certain prerequisites must be fulfilled prior to the installation.
For upgrades, all previously defined SQL connection parameters are loaded from the existing configuration. If Windows authentication is being used, run the installer with the same user that is defined for the CxServices or any other Windows authenticated user with DB owner permission on CxDB, CxActivity and CxARM. |
| Info | ||
|---|---|---|
| ||
DBaaS is not supported natively. but AWS RDS can be used - To make RDS work you need to create three databases, CxDB, CxActivity and CxARM. Give the user that you created for Checkmarx dbo privileges to the newly created databases. Run the installer again and when the installation connects to the Database and you see a message about the three databases already existing, just click continue. Once the installation is complete the RDS should work. |
Setting Up CxSAST
License Validation
It is recommended to obtain a license before you start your installation. This way you will be able to provide the license during the installation and be able to use the product immediately.
Your CxSAST license is tied to a specific machine (server); so all you have to do is to run the Cx HID Generator and a HID (hardware identification number) is provided. The HID Generator can be downloaded from the Cx Utilities page.
Please send the Hardware ID number to your technical contact or your sales manager. They will send you back your license. If you do not know who to send the Hardware ID to, please send it to support@checkmarx.com.
| Info |
|---|
If you have already installed CxSAST and have not yet obtained a permanent CxSAST license, send your hardware ID (Start > All Programs > Checkmarx > HardwareId) to your Checkmarx sales representative or Checkmarx support to obtain a Production license file. |
Installation Package
- Download the CxSAST installation package.
- On each server component host:
- Extract the downloaded ZIP archive, supplying the password provided by Checkmarx support.
- Run CxSetup.exe and begin the installation.
Installing CxSAST
Prerequisites and Recommendations
- The installer requires .Net 4.7.1 Framework installed on your server (If missing, it will be installed by the CxSAST installer).
- The required Web Server for Checkmarx is IIS Server (if missing, it will be installed by the CxSAST installer on the condition that the Windows installation media is accessible).
- SQL 2012 Express is included with the CxSAST installer and is installed (if defined) in the event that no other version of SQL is already installed.
Installation
Once you have downloaded the CxSAST Installation package, run the CxSetup.exe. The Checkmarx Welcome window is displayed.

Click ALL IN ONE to continue, ADVANCED to define additional setup options, or X to exit. The Checkmarx License Agreement window is displayed.
.jpg?version=1&modificationDate=1528109282089&cacheVersion=1&api=v2&width=650)
Review and accept the license agreement by checking the 'I accept the terms in the License Agreement' checkbox. Click Next to continue.
If you selected ADVANCED, the additional Installation Options window is displayed.

Click Select to define the CxSAST installation location.
| Info | ||
|---|---|---|
| ||
For upgrades, previously installed location and product feature settings are loaded from the existing configuration and cannot be changed. You can however install or remove product features by using the modify feature. |
Select the required product features for this installation from the available list. You can also select the option to install related shortcuts on your desktop.
| Info | ||
|---|---|---|
| ||
|
| Info | ||
|---|---|---|
| ||
Checkmarx Application Risk Management (CxARM) – an application security risk management solution comprised of CxARM Analytics and CxARM Policy Management – for defining, tracking, evaluating and enforcing an organization’s unified AppSec security policies, risks and status with a high level of visibility. |
Click Next. The Prerequisites Check window is displayed, showing the status of all prerequisite components.

For any prerequisite not installed, click the respective INFO button for additional installation information, and then click Prerequisites Folder to install the missing component(s).

Click Recheck Prerequisites to confirm the installation status.
When all prerequisite components are installed, click Next to continue. The CxSAST SQL Server Configuration window is displayed.

For CxSAST, define a connection to the installed SQL Server or to any other SQL server on your network, by selecting one of the following:
- Connect using integrated Windows authentication (login not required)
- Connect using SQL Server authentication (provide SQL user name and password for login with SA permissions).
Click Test Connection. A "Connection OK" message is displayed upon confirmed connection to the SQL Server.
| Info | ||
|---|---|---|
| ||
|
A notification displays if existing SQL Express files are detected.
| Info | ||
|---|---|---|
| ||
|
Click OK on the message, and then click NEXT to continue.
If installing CxARM, the CxARM Message Broker Configuration window is displayed.

| Info | ||
|---|---|---|
| ||
|
Click Next.
If installing CxARM, the Apache Tomcat Configuration window is displayed.

| Info | ||
|---|---|---|
| ||
|
Click Next.
If installing CxARM, the CxARM SQL Server Configuration window is displayed.
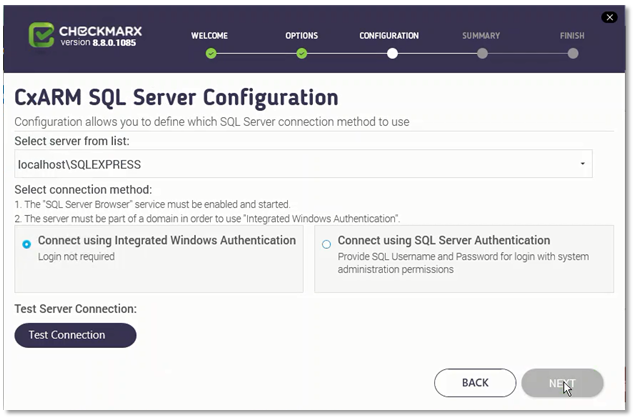
For CxARM, define the SQL Server connection by selecting one of the following:
- Connect using Integrated Windows Authentication (login not required)
- Connect using SQL Server Authentication (provide SQL user name and password for login with SA permissions)
| Info | ||
|---|---|---|
| ||
For M&O Layer SQL Server connectivity, both Dynamic and Static port configurations are now supported. See Configuring Management & Orchestration SQL Server for Dynamic and Static Port Connectivity for additional information. The following prerequisites and recommendations are required:
|
Click Test Connection. A "Connection successful" message is displayed upon confirmed connection to the SQL Server.
| Warning | ||
|---|---|---|
| ||
If connection to the CxARM database fails, in order to continue with the installation, a confirmed connection is required. If the "SQL Connection Test Results" message indicates that connection to CxARM database has failed, verify the following:
|
Click OK on the message, and then click NEXT.
The License Activation window is displayed.

| Info | ||
|---|---|---|
| ||
For upgrades the license information (if it exists and is valid) is automatically loaded from the existing configuration and the License Activation window is not displayed. |
Select the preferred licensing method by selecting one of the following:
- Import new license: If you already have a valid CxSAST license file, select the Import New License option and then click Import License Browse to the file location.
- Request new license: If you have not yet obtained a permanent CxSAST license. Select the Request New License option and then click Copy to Clipboard. Send the copied Hardware ID to your Checkmarx sales representative or contact Checkmarx support.
.jpg?version=1&modificationDate=1528109287782&cacheVersion=1&api=v2&width=650)
| Info | ||
|---|---|---|
| ||
Once you have obtained a new or updated Checkmarx license, you can use the license importer to import the license into CxSAST (see Updating the CxSAST License). |
Click NEXT to continue.
| Info | ||
|---|---|---|
| ||
If your license doesn't match your current hardware ID (HID) a warning message is displayed. |
If the default port 80 is occupied, the Validate Port window is displayed.
| Info | ||
|---|---|---|
| ||
Port 80 is allocated as the default port for Checkmarx applications. In clean installations the Validate Port window is displayed only if one of the following occurs:
|
If required, select another port and click Validate Port.
Click NEXT to continue. The Setup Summary window is displayed.

Check the setup summary according to your selection.
Click INSTALL to continue, BACK to return to the previous window, or X to exit. The Installation in Progress window is displayed.

| Info | ||
|---|---|---|
| ||
If the installation fails, the "Setup failed" message is displayed. For more information, see the installation logs. If you need further assistance, please contact Checkmarx support. |
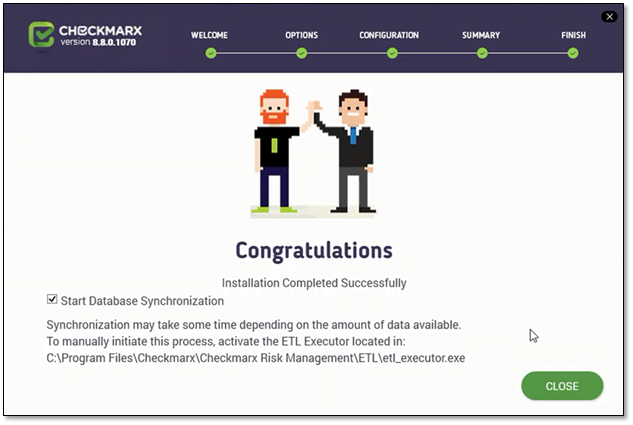
Once complete the Installation Completed Successfully window is displayed.
| Info | ||
|---|---|---|
| ||
If you have installed Management and Orchestration, according to the Congratulations window, by default the Start Database Synchronization checkbox is selected. This enables Management and Orchestration (CxARM) and initializes the automatic synchronization process that extracts data from the CxSAST database to the CxARM database. This process may take a while, depending on the amount of data being synchronized. You can either perform the database synchronization now, or manually at a later time using the ETL Executor located in: NOTE: This folder may vary according to the selected Checkmarx installation folder. For more information about Management and Orchestration prerequisites and recommendations, see Setting Up Management and Orchestration. For more information about installing Management and Orchestration, see Installing Management and Orchestration. |
| Info | ||
|---|---|---|
| ||
If attempting to install CxSAST with CxARM and connect to an existing CxARM DB, the subsequent ETL DB sync will fail, due to a limitation in CxARM. Therefore, in order to reinstall CxSAST with CxARM, either delete the existing CxARM DB before reinstalling, or reinstall with a new CxARM DB. |
To continue now with the database synchronization:
Leave the checkbox selected, and then click CLOSE.If required, reboot the server (you will receive a prompt if rebooting is necessary). The database synchronization process starts automatically.
To perform the database synchronization at another time:
Alternatively, you can manually initiate the synchronization process at a later time by clearing the checkbox now, and clicking Close. At a later time use the ETL tool to perform the synchronization, located at: C:\Program Files\Checkmarx\Checkmarx Risk Management\ETL\etl_executor.exe
NOTE:This folder may vary according to the selected Checkmarx installation folder.
For more information on Application Risk Management, see Installing CxARM.
Installed Services Check
Go to Start > Control Panel > System and Security > Administrative Tools > Services

| Info |
|---|
The database (DB) is required to be up and running in order for Checkmarx services to be able to run. |
Make sure the following installed Checkmarx services are started:
On a centralized host:
- CxJobsManager
- CxScansManager
- CxSystemManager
- CxScanEngine
- Web Server:
- IIS Admin Service
- World Wide Web Publishing Service
- Application Risk Management:
- CxARM
- CxARMETL
On a CxEngine host:
- CxScanEngine
| Info |
|---|
For updating or customizing non-default service accounts, please refer to Configuring CxSAST for use with a non-default user (Network Service) - CxServices & IIS Application Pools. |
Installed Application Pool Check
Go to Start > Control Panel > All Control Panel Items > Administrative Tools > Internet Information Services (IIS) Manager

Make sure the following installed application pools are started:
On a centralized host:
- CxClientPool
- CxPool
- CxPoolRestAPI
| Info |
|---|
If the IIS Pools are not started automatically after installation, you should restart the machine. |
Enable Long Path Support in CxSAST Application
.NET framework 4.6.2 and above supports the Long Path feature by default. The following actions should be taken in order for the Long Path feature to be enabled.
The following configuration should be added to the Web Service and REST API:
<httpRuntime targetFramework="4.6.2" />
| Info |
|---|
The web.config file is usually located in the following path: c:\Program Files\Checkmarx\Checkmarx Web Services\CxWebInterface\web.config |
For example:
<system.web>
<httpRuntime targetFramework="4.6.2" />
<compilation targetFramework="4.5.1" debug="true"/>
</system.web>
| Info |
|---|
If the httpRuntime already exists, add the targetFramework attribute as follows: <httpRuntime maxRequestLength="2097151" executionTimeout="36000" targetFramework="4.6.2" /> |
| Info |
|---|
Keep in mind that this configuration should only added on a machine that has .NET 4.6.2 or above installed, otherwise there will be issues in the application. |
Login to the Web Interface
Access the CxSAST web interface in either of the following ways:
Access CxSAST locally (from the server host) by using the Checkmarx Portal shortcut on the Desktop or navigate to the Checkmarx folder (Start > All Programs > Checkmarx > Checkmarx Portal).
To access CxSAST from any other computer, make sure that organizational routing and firewall configuration allow the client computer to access the CxSAST server. Point your browser to: http://<server>/cxwebclient/login.aspx where <server> is the IP address or resolvable hostname of the CxSAST server.
Upon a fresh installation, a single Administrator Account needs to be created.
Once the Set Administrator Credentials window is displayed, add the following credentials:
- Administrator User Name
- Password
- Confirm Password

| Info | ||
|---|---|---|
| ||
The required password complexity is as follows: 9 to 400 characters, at least 1 uppercase letter, at least 1 lower case letter, at least 1 special character, at least 1 digit. |
Click Confirm to complete.
You can subsequently change the Administrator password and add CxSAST users.
In a distributed architecture:
Go to Management > Application Settings > Engine Management. The Engine Management window is displayed.
Click Register Engine Server. The Register Engine Server window is displayed.
Give the Engine a Server Name, and provide the Server URL, so that CxManager will be able to communicate with CxEngine. The URL should be: http://<Server_Name>/CxSourceAnalyzerEngineWCF/CxEngineWebServices.svc
(where <Server_Name> is the CxEngine host's IP address or resolvable name).
Optionally define Scan LOC Limits (maximum lines of code allowed).

| Info | ||
|---|---|---|
| ||
It is recommended to check the defined URL by opening it in a browser on the CxManager Server to validate. |
Click Update.
Multiple CxEngine Servers:
If you have multiple CxEngine Servers, repeat the above step for each one.
Go to Management > Application Settings > General.
After updating the information, at the bottom of the page, click Update:

Server Settings
If permitted by your CxSAST license, set the “Maximum number of concurrent scans“ to the desired number for all the CxEngine Servers.
Enable Long Path Support in Server Settings
In order for the long path feature to be fully supported in CxSAST, click Edit and check the Long Path Support checkbox.
| Warning | ||
|---|---|---|
| ||
Click Got It on the message window to confirm your understanding that all application servers must support long paths, otherwise scans with long path files may fail. |
Click Update to save the changes.
SMTP Settings
Provide SMTP settings. Other settings should usually be left as they are. Optionally, you can configure the "From" field of emails. If you don't configure it, it will be left empty.
Click Update to save changes.
OSA Settings
If licensed for CxOSA, select the OSA (Open Source Analysis) scan option and click Update.
Email Verification
Verify that the email address in the CxSAST profile settings (My Profile > Account Information) is of a valid format, i.e. John.Smith@example.com, and not John.Smith@example. This is required for AppSec Coach registration.
Installation Verification
Go to Management > Application Settings > Installation Information.

Validate that you have successfully installed the correct version and/or hot-fix and review all CxSAST system components ensuring that they are all of the same version.
...
| Section | ||||||||
|---|---|---|---|---|---|---|---|---|
|