Viewing Project Details (v9.0.0 to v9.2.0)
You can view detailed information about a particular project from the Projects window.
To open the Projects window, go to Projects & Scans > Projects. The Projects window is displayed.
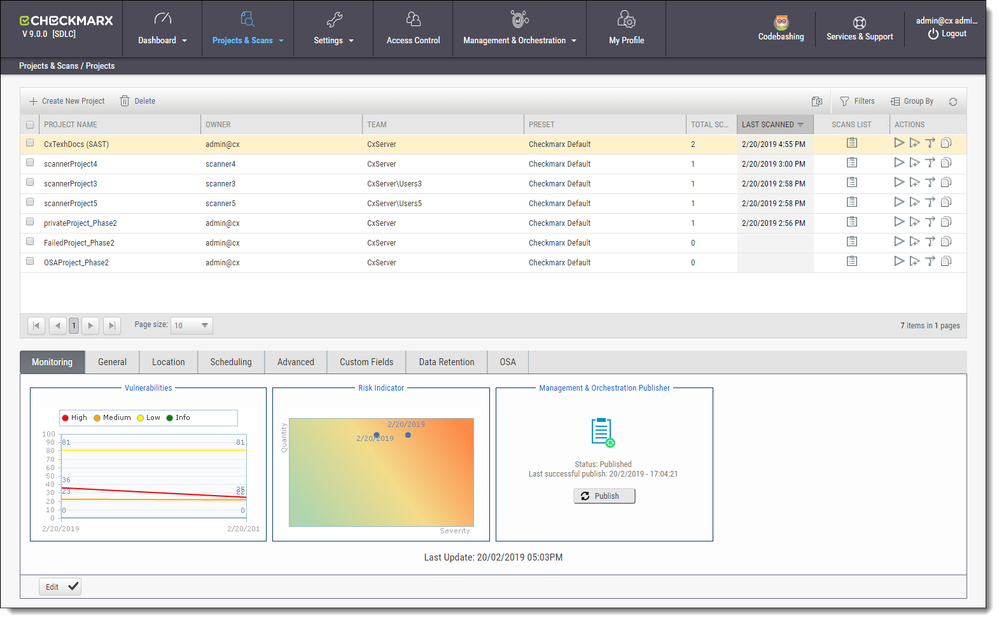
The Projects window lists all the projects that are configured for groups where the logged-on user is a member. You can also manage the table.
For a non-local project, or for an Incremental scan of a local project, Total Scans counts only scans when the code had changes relative to the previous scan.
For each project, you can view its scans or perform other actions.
Selecting a project displays its details in the tabbed panel below.

The Monitoring tab represents the evolution of the project last 10 scans focusing on the numbers of found vulnerabilities and overall risk.
- The Vulnerabilities chart includes a graph for vulnerabilities of each severity level (High, Medium, Low, and Info). Each graph presents numbers of found vulnerability instances (y axis) for progressive scans by date (x axis).
- The Risk Indicator chart represents each scan result combining quantity and severity of found vulnerability instances.
- The Management & Orchestration Publisher indicator provides the capability to manually synchronize the latest scan for a specific project to the latest policy definition. This provides you with the most updated policy status for your project. The ‘Publish’ status indicates that synchronization has not yet been processed. 'In Progress' status means that its currently in-process. Once synchronization is complete, the status changes to ‘Published’ with the last successful publish date and time displayed.
Click Edit to change settings and then click Update to save the changes.
General Properties
Click the General tab to display its properties.
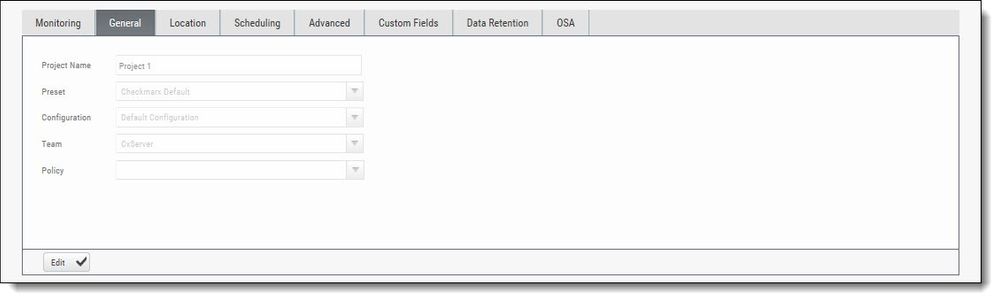
The General tab represents the project name, defined preset, configuration, associated team and policy assigned to the project.
For more information about defining these properties refer to section about General properties in Creating and Configuring Projects.
Click Edit to change settings and then click Update to save the changes.
Location Properties
Click the Location tab to display its properties.

The Location tab represents the various options for locating and pulling the source code for scanning.
For more information about defining these properties refer to section about Location properties in Creating and Configuring Projects.
Click Edit to change settings and then click Update to save the changes.
Scheduling Properties
Click the Scheduling tab to display its properties.

The Scheduling tab represents the various options for scheduling the automatic scans.
Scheduling is not available for Local source code location, since the CxSAST Server cannot automatically access the local source. You will need to periodically manually upload a new zip file.
For more information about defining these properties refer to section about Scheduling properties in Creating and Configuring Projects.
Click Edit to change settings and then click Update to save the changes.
Advanced Properties
Click the Advanced tab to display its properties.

The Advanced tab represents the various options for pre/post scan actions and issue tracking settings.
For more information about defining these properties refer to section about Advanced properties in Creating and Configuring Projects.
Click Edit to change settings and then click Update to save the changes.
Custom Fields Properties
Click the Custom Fields tab to display its properties.

The Custom Fields tab represents the option to define additional project properties using the predefined custom fields.
For more information about defining these properties refer to section about Custom Field properties in Creating and Configuring Projects.
Click Edit to change settings and then click Update to save the changes.
Data Retention Properties
Click the Data Retention tab to display its properties.

The Data Retention tab represents the option to define the number of last scans to be kept for the project. This helps to manage data storage consumption.
For more information about defining these properties refer to section about Data Retention properties in Creating and Configuring Projects.
Click Edit to change settings and then click Update to save the changes.
CxOSA Properties
Click the OSA tab to display its properties.

The OSA tab represents the option to define the location of the open source code libraries for analysis and resolving dependencies.
For more information about defining these properties refer to section about Open Source Analysis properties in Creating and Configuring Projects.
Click Edit to change settings and then click Update to save the changes.