Settings Tab - LDAP Server Settings (v2.0 and up)
LDAP Server Settings allows for the Access Control Admin or Access Control Manager user to set up and define settings for LDAP servers.
Configuring LDAP Server Settings (LDAP Page)
LDAP (Lightweight Directory Access Protocol) is an Internet protocol that Web applications can use to look up information about users and groups from the LDAP server – such as information pertaining to authentication, authorization, group and role mapping. Connecting to an LDAP directory server is useful if user groups are stored in a corporate directory. Synchronization with LDAP allows for the automatic creation, update and deletion of users and groups in the Checkmarx product, according to any changes being made in the LDAP directory.
You can configure one or more LDAP servers in the system.
Configuring a New LDAP Server
To configure a new LDAP server, go to the Settings tab > LDAP (LDAP Settings) page.

Click Add New LDAP Server. The LDAP Servers > Server Settings tab is displayed.
Three tabs can be configured for the LDAP server: Server Settings, Directory Settings (required) and Synchronization (optional, disabled by default). Each tab displays the default (but changeable) attributes in its respective fields – according to the directory type selected.
LDAP Settings – Server Settings Tab
The first of three tabs to configure on the LDAP Servers page is Server Settings, where you configure the LDAP server connection settings.

The LDAP Settings > Server Settings page provides the following information fields/options.
| Field | Description |
|---|---|
Enable LDAP Server | Toggle to enable/disable the LDAP server. NOTE: Disabling the LDAP server will prevent the users of this LDAP server from logging into the system. It will still be possible to manually add users and map LDAP groups to roles. |
Server name * | Enter the name of the LDAP server. NOTE: This name that will also be used in the login page. |
Host name * | Enter the LDAP server hostname For example: ldap.company.com |
Port * | Enter the LDAP server port For example: 389, 636 (for SSL) |
User name & Password * | Enter the credentials of the binding user (LDAP bind username and bind password). NOTE: User needs at least read permissions to the LDAP directory. The username can be in the following formats: <domain\username> or <username@domain> or <full user DN> For example: user@domain.name or cn=user,dc=domain,dc=name |
Use SSL | Check this to connect to the LDAP server using SSL encryption |
Verify SSL certificate | Check this to verify the SSL certificate. NOTE: If you are using an untrusted certificate, you can cancel the verification of certificate to make the connection pass. SSL will still be used and the network will be encrypted. |
* indicates required field
After all information is entered, click Test Connection to validate the LDAP connectivity. A message informs you of the test status.
Upon a successful connectivity test, click Save, and then configure in Directory Settings.
LDAP Settings – Directory Settings Tab
The second tab to configure on the LDAP Servers page is Directory Settings.
Example of Directory Settings page, for the directory type Active Directory:

The following is an example of Directory Settings page, for the directory type Open LDAP:
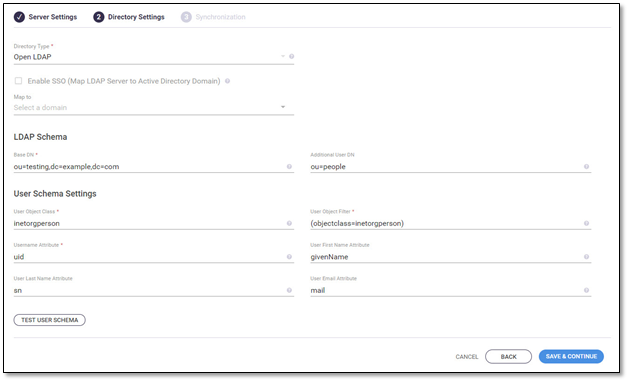
The LDAP Settings > Directory Settings page provides the following information fields/options.
| Field | Description |
|---|---|
Directory Type * | Select from the options: Active Directory, Open LDAP, Custom LDAP Server. Server attributes are automatically populated according to default settings. |
Enable SSO | NOTES:
|
Domain * | Select a Windows domain to map the LDAP server to. NOTES:
|
Base DN * | The LDAP root node for searching users. |
Additional User DN | Limits user search to specific DN (in order to optimize the search time). The additional user DN is appended to the base DN. NOTE: Do not repeat the base DN in this field. |
User Object Class * | The LDAP user object class type to use when loading users. |
User Object Filter * | The filter expression to use when searching user objects. |
Username Attribute * | The attribute field to use on the user object |
User First Name Attribute * | The attribute field to use when loading the user’s first name. |
User Last Name Attribute * | The attribute field to use when loading the user’s last name. |
User Email Attribute * | The attribute field to use when loading the user’s email |
* indicates required field
After all information is entered, click Test User Schema to check the connection to the LDAP server, and validate the user schema settings and attributes. A message informs of the test status.
Upon a successful user schema test, click Save and then configure in Synchronization.
LDAP Settings – Synchronization Tab
The third tab to configure on the LDAP Servers page is Synchronization.

| Field | Description |
|---|---|
Synchronization enabled/disabled | If synchronization is disabled, users will need to be created manually (via Import from Directory only), as there is no information about role and team in order to create them. Enabling synchronization enables automatically creating new LDAP users who will be automatically assigned to roles and teams, according to their LDAP mapping. NOTE: If synchronization is disabled, login can only be performed only using existing LDAP users. If synchronization is enabled, a user can easily login with only user name and password. |
| ROLE AND TEAM MAPPING | |
Enables defining the default role(s) and team(s) to be assigned to newly-created LDAP-based users. | |
Default Role & Default Team * | Define the default role and team that will be assigned to newly-created, LDAP-based users. NOTE: A default team (but not a default role) must be selected when synchronization is enabled. In the Hierarchy tree, you can search for a specific team by any string contained within the team information (see Hierarchy Tree Team Search). These defaults (for Role and Team) will be used in case no Advanced Team and Role Mapping were defined for a current user trying to login. |
Automatically update user role and team upon login | If checked, a user’s role and team will be automatically updated upon login, according to default or Advanced Team and Role Mapping. NOTE: If this feature is not checked, a user's personal details will only be updated once – at the first login. |
Periodically sync user availability | If checked, then every 24-hours all LDAP users (usernames) that were deleted from the LDAP server will be deactivated in Access Control (therefore freeing up those licenses). A red indicator next to a user’s name (on the list of users – User’s tab) indicates the user has been deactivated:
NOTE: If the connection to the LDAP server fails, the deleted users will not be deactivated in Access Control. |
Advanced Team and Role Mapping | Enables mapping roles and teams to LDAP groups. Enables a user’s role to be automatically set according to specific LDAP group DNs. Enables the user to automatically be assigned to a team according to LDAP mapping configuration (see Access Control - Teams Tab > LDAP Group Mapping). |
| Enable Default Team | When advanced Team and Role Mapping is enabled – enables or disables Default team mapping |
| Enable Default Role | When advanced Team and Role Mapping is enabled – enables or disables Default role mapping |
| GROUP SCHEMA SETTINGS | |
Enables defining the search of LDAP groups that can be mapped to teams (see Access Control - Teams Tab > LDAP Group Mapping). | |
Additional Group DN | [Optional]: The Additional Group DN (appended to the Base DN) reduces the search scope to a specific DN when searching for groups. NOTE: Do not repeat the Base DN in this field. |
Group Object Class | Used for team mapping, it defines the group object class, and limits group searching to a specific DN. NOTE: Required if Synchronization and Advanced Team and Role Mapping are enabled. |
Group Object Filter | Used for team mapping, Group Object Filter is an LDAP filter expression for use when searching groups. NOTE: Required if Synchronization and Advanced Team and Role Mapping are enabled. |
Group Name Attribute | Used for team mapping, Group Name Attribute is an attribute in LDAP defining a group’s name. NOTE: Required if Synchronization and Advanced Team and Role Mapping are enabled. |
| MEMBERSHIP SCHEMA SETTINGS | |
Enables defining the attributes that associate the LDAP users with their assigned teams. | |
Group Members Attribute (member) | An LDAP member attribute which is multi-value, it contains a list of unique names for users in the team (user DNs), as well as group and contact objects that are members of the group. It is used to determine the logged in user groups, in order to perform the right mapping to roles and teams. NOTE: Required if Synchronization and Advanced Team and Role Mapping are enabled. |
User Membership Attribute (memberOf) | An LDAP memberOf attribute which is multi-value, it contains all the groups that the current user is a member of (group DNs). If designated, this attribute replaces the Group Members Attribute for determining the logged in user groups (taking the groups the user belongs to straight from the user entry, instead of searching inside every group). |
| ADVANCED ROLE MAPPING | |
Define what role(s) the users in specific LDAP group(s) will be assigned (mapped) to. Multiple roles can be assigned to the same LDAP Group DN. 1. Click Edit Advanced Role Mapping. 2. Click the arrow in the Cx Role field and then select a role from the options. 3. In the LDAP Group DN field, use a semicolon to separate multiple group entries. Examples: cn=dev;ou=grp;dc=my;dc=org;cn=qa;ou=grp;dc=my;dc=org 4. Repeat this procedure for each LDAP group—role mapping. 5. Click Update. | |

* indicates required field
After you have finished configuring synchronization settings (or if you have disabled synchronization), click Test User & Group Schema to check the connection to the LDAP server, validate the user schema settings and attributes, and validate the group. A message informs of the test status.
Click Save.
Editing an LDAP Server Configuration
To edit an existing LDAP server configuration, go to the Settings tab > LDAP (LDAP Settings) page.

Click EDIT. The LDAP Servers > Server Settings tab is displayed.
Edit as needed in any of the three tabs: Server Settings, Directory Settings, Synchronization.
Be sure to test the connection, user schema, and user & group schema as applicable, and click SAVE on every tab that has been edited. See Configuring a New LDAP Server, above.

Deleting an LDAP Server Configuration
Deleting an LDAP server configuration will remove all associated user data.
To delete an existing LDAP server configuration, go to the Settings tab > LDAP (LDAP Settings) page.

For the LDAP server configuration you want to delete, click its delete icon  , and then on the confirmation message click DELETE.
Creating LDAP Users in CxSAST
After configuring the LDAP server with SAST, you can import LDAP users into SAST.
- Go to the Users tab.
- Click Add User.

- On the pop up, click Import From Directory.

- Search for the user that you want to import from the LDAP directory and the press Enter.
Login using LDAP Single Sign-on
Login using LDAP single sign-on can be performed from the CxSAST web interface as follows:
- Access the CxSAST web interface by using the Checkmarx Portal shortcut on the Desktop or navigate to the Checkmarx folder.
- On the Login screen, for the Sign in method, select LDAP.

NOTE- The LDAP Login option is only available in the CxSAST Login screen if LDAP is enabled in the LDAP configuration (Access Control > Settings > LDAP > LDAP Servers > Server Settings> Enable LDAP Server).
