In this example OKTA is used as the SAML IdP.
Creating a Service Provider Application in OKTA
To create a Service Provider application in OKTA:
Navigate to https://www.okta.com/login/ and enter your organization's address. OKTA will send you your own OKTA Login screen, where you can access your account directly.

Sign in to your OKTA administration account using your Username and Password credentials. The Launch Apps screen is displayed.

Click Admin. Click Dashboard. The Dashboard screen is displayed.

Click Add Applications. The Add Applications screen is displayed.

Click Create New App. The Create a New Application Integration screen is displayed.

Select the SAML 2.0 option and click Create. The Create SAML Integration - General Settings screen is displayed.

Add your chosen Service Provider application name into the App Name field (e.g. CxSAST via SAML).
Click Next. The Create SAML Integration - Configure SAML screen is displayed.
...
| Redirect | ||||||||
|---|---|---|---|---|---|---|---|---|
|
...
|
...
|
...
|
...
.jpg?version=1&modificationDate=1477842149353&cacheVersion=1&api=v2&width=850)
Single sign on URL is composed from the Checkmarx URL and “/cxrestapi/auth/samlAcs”, e.g. https://checkmarx.corp.net/cxrestapi/auth/samlAcs. This is the location where the SAML assertion is sent with a HTTP POST.
Audience URI (SP Entity ID) field should be populated with a unique SP identifier (a single IdP can support multiple services). By convention, Audience URI is the SP server URI, e.g. https://checkmarx.corp.net.
| Info |
|---|
The Entity ID must be identical in both the Service Provider and the Identity Provider. Name ID parameter is required by CxSAST. This is the SAML name identifier of the user. |
Click Next, select I’m a Software Vendor. I’d like to integrate my App with OKTA option and click Finish.
Click Applications. The newly created application is displayed in the Applications screen.
.jpg?version=1&modificationDate=1476964032205&cacheVersion=1&api=v2&width=850)
Assigning Users to the Service Provider Application in OKTA
To assign users to the Service Provider Application in OKTA:
From the Applications screen, select your application and click the People tab. The People screen is displayed.

Click Assign to People. The Assign <Application> to People screen is displayed.

Assign the relevant users to the application by clicking Assign for each user.
Click Save and Go Back to assign the next user.
Click Done to save the changes.
.jpg?version=1&modificationDate=1476964488594&cacheVersion=1&api=v2&width=850)
Confirm that each user has been assigned to the application.
Creating and Mapping User Attributes in OKTA
Even though most attributes are supported, First Name, Last Name and Email are mandatory attributes. These attributes are already defined (but not mapped) in OKTA. All remaining attributes are optional.
Creating Attributes in OKTA
To create attributes in OKTA:
Click Directory and select Profile Editor. The Profile Editor screen is displayed.

Click Profile for the new Checkmarx profile. The Profile screen is displayed.

Click Add Attribute. The Add Attribute screen is displayed.

From the Add Attribute screen, define and add the following attributes:
...
Job
...
Job
...
String
...
No
...
Language
...
Language
...
String
...
No
...
Organization_Tree
...
Organization_Tree
...
String
...
Yes*
...
Is_Auditor
...
Is_Auditor
...
String
...
Yes*
...
Role
...
Role
...
String
...
Yes*
...
Role_Attribute
...
Role_Attribute
...
String
...
No*
* required for IdP Authorization only.
Click Save and Add Another or Add Attribute accordingly.
Mapping User Attributes to the Service Provider (CxSAST)
Click Applications. The Application screen is displayed.
.jpg?version=2&modificationDate=1476967043867&cacheVersion=1&api=v2&width=850)
Select on the Application that you created (e.g. CxSAST via SAML) and click the General tab. The General screen is displayed.
.jpg?version=1&modificationDate=1477842263938&cacheVersion=1&api=v2&width=850)
From the SAML Settings section, click Edit. The SAML Integration - General Settings screen is displayed.

Click Next. The SAML Integration - SAML Settings screen is displayed.
.jpg?version=1&modificationDate=1477842310778&cacheVersion=1&api=v2&width=850)
From the Attribute Statements section, define and add the following attributes:
...
Name
...
Name Format
...
Value
...
First_Name
...
Basic
...
user.firstName
...
Manual and IdP Authorization
...
Last_Name
...
Basic
...
user.lastName
...
Manual and IdP Authorization
...
...
Basic
...
user.email
...
Manual and IdP Authorization
...
Job
...
Basic
...
user.job
...
Manual and IdP Authorization
...
Phone
...
Basic
...
user.primaryPhone
...
Manual and IdP Authorization
...
Cell_Phone
...
Basic
...
user.mobilePhone
...
Manual and IdP Authorization
...
Language
...
Basic
...
user.language
...
Manual and IdP Authorization
...
Organization_Tree
...
Basic
...
appuser.organizationTree
...
IdP Authorization only
...
Is_Auditor
...
Basic
...
appuser.isAuditor
...
IdP Authorization only
...
Role
...
Basic
...
appuser.Role
...
IdP Authorization only
...
Role_Attribute
...
Basic
...
appuser.roleAttribute
...
IdP Authorization only
| Info |
|---|
For IdP Authorization, First_Name, Last_Name, Email, Organization_Tree, Is_Auditor and Role attributes are mandatory. For Manual Authorization, First_Name, Last_Name, Email are required. The remaining attributes are optional. |
| Info |
|---|
For ADFS only: Below claim rule should be defined explicitly:
|
Click Add Another to add additional attribute fields.
.png?version=1&modificationDate=1485961347845&cacheVersion=1&api=v2&width=650)
Once complete, click Next, select I’m a Software Vendor. I’d like to integrate my App with OKTA option and then click Finish.
Adding Attributes to a Specific User
Click Directory and select People. The People screen is displayed.

Click on the Person & User Name. The selected user’s Profile screen is displayed.

Click the Profile tab. The Profile screen is displayed.

Click Edit.
Once the Attribute fields become active, enter description information for each attribute:
...
Attributes
...
Description
...
First name
...
User’s first name (e.g. David)
...
Last name
...
User’s family name (e.g. Press)
...
Primary email
...
Primary email (e.g. david.press@check.com)
...
Job
...
Job title (e.g. Software Engineer)
...
Primary phone
...
Primary contact telephone number (e.g. 77523632562)
...
Mobile phone
...
Contact mobile number (e.g. 052563256214)
...
Language
...
User’s preferred language (e.g. en-US (English – US) / zh-TW (Chinese - Traditional, Taiwan) / jp-JP (Japanese - Japan) / ko-KR (Korean - Korea) / zh-CHS (Chinese - Simplified))
...
Organization_Tree
User's organization according to the tree branch: \CxServer\SP\Company\Team
| Info | ||
|---|---|---|
| ||
Can also be multiple attributes separated by ',' delimiter: e.g. \CxServer\SP\Company1\User1,CxServer\SP\Company2\Team2 |
...
Is_Auditor
...
User's auditor rights (true/false)
...
Role
...
User's organizational role:
Organization_Tree > Role value Allowed
\CxServer > ServerManager
\CxServer\SP > SPManager
\CxServer\SP\Company > CompanyManager
\CxServer\SP\Company\Team or under > Scanner or Reviewer
...
Role_Attribute
User's role options:
- AllowProjectAndScanDelete (Scanner role only)
- AllowNotExploitable (Scanner role only)
- AllowSeverityAndStatusChanges (Reviewer role only)
| Info | ||
|---|---|---|
| ||
Can also be multiple attributes separated by ',' delimiter: e.g. AllowProjectAndScanDelete,AllowNotExploitable |
Click Save to save the changes.
Retrieving Identity Provider Setup Information
Click Application. The Applications screen is displayed.
Select your Application (e.g. CxSAST via SAML).
Once the Application screen is displayed, click the Sign On tab. The Sign On screen is displayed.

Click View Setup Instructions. The Setup Instructions screen is displayed.
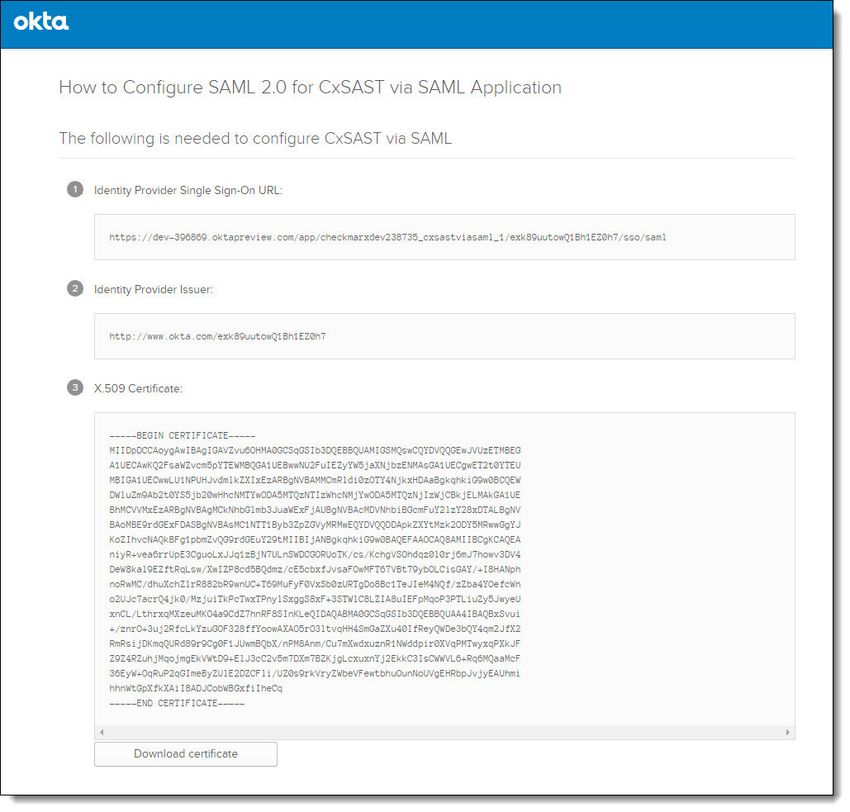
Click Download Certificate. The SAML certificate file (.cert) is downloaded to the default download directory. This file is used during the Configuration of SAML in CxSAST (see Importing the SAML Certificate into CxSAST).
The following values are also used during the Configuration of SAML in CxSAST:
Identity Provider Single Sign-On URL (e.g. https://dev-396869.oktapreview.com/app/checkmarxdev238735_cxsast_1/exk7jivioeSb6n2EI0h7/sso/saml) is relevant to the Login URL field in the SAML Configuration in CxSAST.
Identity Provider Issuer (e.g. http://www.okta.com/exk7jivioeSb6n2EI0h7) is relevant to the Issuer (Identity Provider) field in the SAML Configuration in CxSAST.
...
| Column |
|---|
Read more: |
...
|
...