SAML Management (v8.8.0 to v8.9.0)
Security Assertion Markup Language (SAML) is an XML-based format for exchanging authentication and authorization data between an identity provider and a service provider. Checkmarx’s Static Analysis Security Solution (CxSAST) has just become SAML 2.0 aware and can now be configured to act as a SAML 2.0 Service Provider. SAML supports the user lifecycle by retrieving users from the Identity Provider (IdP) and defining them in CxSAST. This allows for more centralized and enhanced user management.
SAML login for CxAudit is currently not supported.
Configuring SAML in CxSAST
Before you start with Configuring SAML in CxSAST, Enabling HTTPS on the CxSAST Server and Configuring the Identity Provider are required in order to proceed.
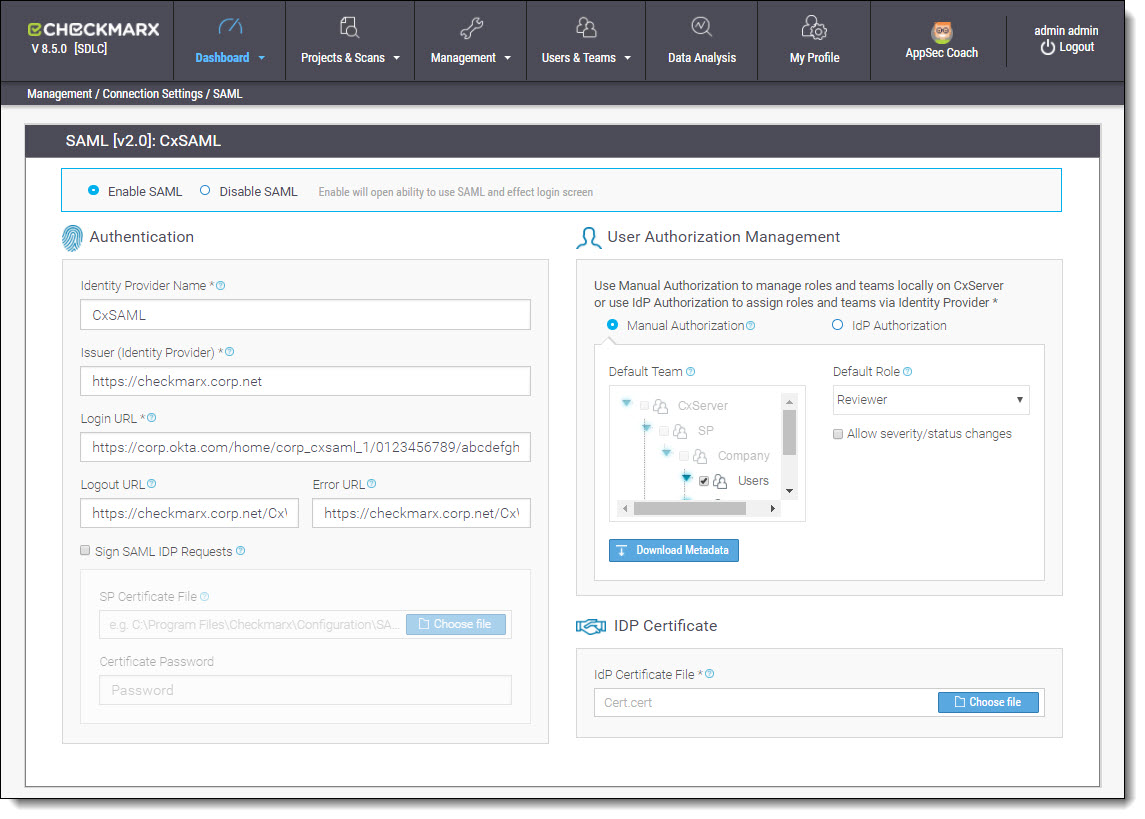
From the CxSAST application, go to Management > Connection Settings > SAML. The SAML Configuration screen is displayed.
Select Enable SAML in order to activate the SAML Configuration screen.
The SAML Single Sign-In option won’t be available in the CxSAST Login screen unless SAML is enabled.
Fill the following Authentication parameter fields:
| Parameter | Description |
|---|---|
Identity Provider Name | Name given to the SAML Identity Provider (e.g. CxSAML) |
Issuer (Identity Provider) | Element which contains the unique identifier of the IdP, and will usually contain the URL of the IdP and a hash (e.g.: http://www.okta.com/exkac5ylseLJUQLeZ0h7). This parameter is provided by the Identity Provider setup information (see Retrieving Identity Provider Setup Information). |
Login URL | Identity Provider login location where SAML requests will be sent (e.g. https://corp.okta.com/home/corp_cxsaml_1/0123456789/abcdefghij). This parameter is provided by the Identity Provider setup information (see Retrieving Identity Provider Setup Information). |
Logout URL | Location where logout instances will be redirected (e.g. https://checkmarx.corp.net/CxWebClient). |
Error URL | Location where error instances will be redirected (e.g. https://checkmarx.corp.net/CxWebClient/ErrorPages/Default_Error.aspx). |
| Issuer (Audience) | The local server name is the issuer by default. Changing the default is done in the database: [CxDB].[dbo].[CxComponentConfiguration], [Key] = 'SamlServiceProviderIssuer', [Value]= '<SP Issuer>' |
| CxSAST Login URL | The local server name is the host name by default. Changing the default is done in the database: [CxDB].[dbo].[CxComponentConfiguration], [Key] = 'WebServer', [Value]= '<Host name>' |
| Sign SAML IdP Requests | Select to enable the Sign SAML IdP Requests option. This assures that every request sent to the IdP server is signed with a Service Provider certificate. |
| SP Certificate File | Click Choose File and navigate to the relevant certificate file (.p12 or .pfx formats only). The uploaded certificate file should contain a private key. |
| Certificate Password | Enter the unique password for the certificate file. Password is only required when a certificate is added or updated. |
Select the preferred Authorization method:
| Method | Description |
|---|---|
Manual Authorization | User creation managed by the SAML Identity Provider and authorization performed manually by CxSAST user management.
|
IdP Authorization | Teams and roles managed by the SAML Identity Provider are automatically updated upon login to CxSAST. The definitions for the update are defined during the creation and mapping of user attributes in the SAML IdP (see Creating and Mapping User Attributes in OKTA). |
Download Metadata | The Metadata file may be required for troubleshooting by the IdP admin, or for defining missing attributes (see Configuring the Identity Provider). Click Export Metadata. The metadata file is downloaded to the default download directory (see Exporting the Metadata File from CxSAST). |
Importing the SAML Certificate into CxSAST
In order for CxSAST to validate the authentication token, the IdP certificate (.cert) needs to be imported and installed on CxSAST (CxManager location).
From IDP Certificate, click Choose File and navigate to the same IdP certificate file (.cert) that was downloaded to the default download directory during the configuration of the Identity Provider (see Retrieving Identity Provider Setup Information).
For instances where there is no other choice but to manually install the IdP certificate file on the CxSAST server trusted root certification authority (see Manually Installing a SAML Certificate on the CxSAST Server).
Click Save to save the changes. The SAML setup confirmation message is displayed.
If the Configuration is not saved (no clear confirmation message), check the log file at: <Checkmarx manager installation>\Logs\WebAPI\WebAPI.log
Exporting the Metadata File from CxSAST
The Metadata file may be required for troubleshooting by the IdP admin, or for defining missing attributes (see Configuring the Identity Provider).
Click Export Metadata. The metadata file is downloaded to the default download directory.
