Configuring the Connection to a Source Control System (v8.8.0 and up)
When creating a project and the source code Location is set to Source Control, you can define to which source control system to connect by selecting a source control type (TFS, SVN, GIT or Perforce).

With Source Control option checked, click Select. The Source Control window is displayed (see below for connection options).
Files inside a zip file that are located inside a repository will not be sent for scanning. Unzip the contents of the zip file to the repository before scanning.
Defining Source Control for TFS
1. Select TFS from the drop-down. The TFS Connection Details panel is displayed.

The TFS Connection Details panel includes the following parameters:
- Repository URL - the repository URL address (Supports HTTP and HTTPS, i.e. <protocol>://<site name>:<port>/tfs/<Collection> (must point to the repository named <Collection>)).
- Port Number - the port number
- Required Authentication - select to enforce authentication
- User Name - the user name (required with enforced authentication)
- Password - the password (required with enforced authentication)
2. Click OK.
Defining Source Control for SVN
1. Select SVN from the drop-down. The SVN Connection Details panel is displayed.

The SVN Connection Details panel includes the following parameters:
- Repository URL - the repository URL address (Supports HTTP, HTTPS and SSH private/public key infrastructure, i.e. <protocol>://<server_ip>/<repository_name>)
- Port Number - the port number
- Required Authentication - select to enforce authentication
- User Name - the user name (required with enforced authentication)
- Password - the password (required with enforced authentication)
- SHH Authentication - select to use secure authentication with SSH
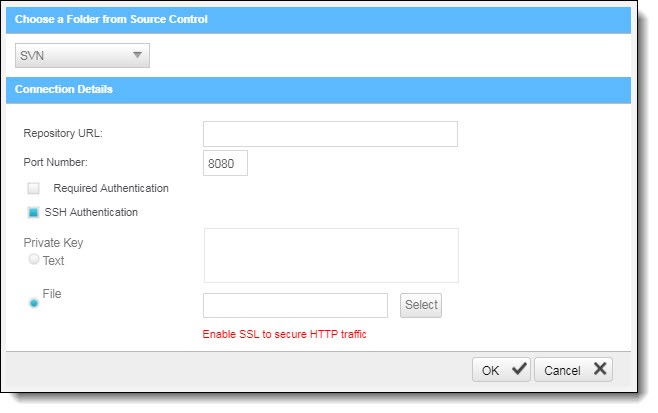
Selecting SHH Authentication displays the following additional parameters:
- Private Key Text - add private key text
- Private Key File - select and upload a private key file
- Checkmarx does not support SSH keys with a passphrase.
- For best results, use ssh-keygen, per these instructions, and not PuTTYgen.
2. Click OK.
Defining Source Control for GIT
Requirements for using GIT repository:
- Download GIT Installation Package and perform the installation on CxSAST Manager Server (use installation defaults)
- Define Path+ exe file in CxSAST Management > Application Settings > General > Path to GIT Client Executable (i.e. C:\Program Files\Git\bin\git.exe).
1. Select GIT from the drop-down. The GIT Connection Details panel is displayed.
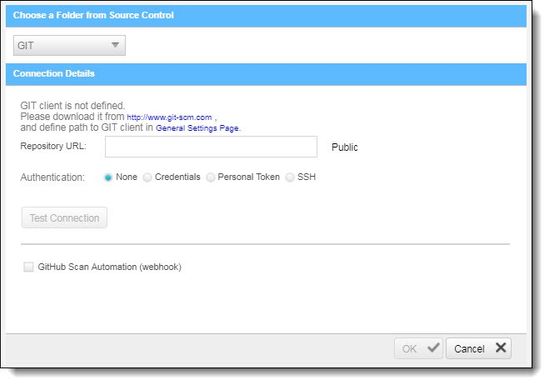
The GIT Connection Details panel includes the following parameters:
Repository URL - the repository URL address (Supports HTTP, HTTPS, i.e. <protocol>://<user>:<password>@<server_ip>/<repository_name>.git or SSH private/public key infrastructure, i.e. git@<git_site>:<user_name>/<repository_name>.git).
- If your repository URL contains the character "@", replace it with "%40" (html encoding) before inserting the URL.
- To locate your GIT Repository URL, refer to GitHub - Tips on Finding Git / GitHub Repository URLs
Authentication - select an authentication method.
For additional information about the various authentication methods, refer to Configuring a Project with Git Integration
2. Click Test Connection. Once the 'Connection Successful' message is displayed, you can continue.
GitHub Scan Automation - select to include GitHub Integration.

3. Enter the GitHub repository owner and collaborator credentials into the relevant User Name and Password fields.
- The GitHub user with repository owner authorization will be used for creating and using a GitHub WebHook (see GitHub Webhooks).
- The GitHub user with repository collaborator authorization is used to create commit comments.
4. Configure the Event threshold. A scan in Checkmarx CxSAST will be initiated only after this number of events has occurred, since the last triggered scan.
By default, the event threshold value is set to 5, because triggering a scan after fewer events may overload the system. If the user specifies a lower number, a warning message is displayed.
5. Click Validate Webhook Credentials to confirm authentication to the GitHub webhooks works correctly. A 'Server Connection Verified Successfully' message is displayed.
6. Click OK to complete procedure.
For more information about the various options for GitHub integration, please refer to GitHub Integration
Defining Source Control for Perforce
Currently, CxSAST is unable to scan code from any system that contains symbolic links.
1. Select Perforce from the drop-down. The Perforce Connection Details panel is displayed.

The Perforce Connection Details panel includes the following parameters:
- Repository URL - the repository URL address (i.e. SSL:<server_ip> or <server_ip>)
- Port Number - the port number
- User Name - the user name
- Password - the unique password
- Browsing Mode - select Depot (for shared file repositories) or Workspace (for grouped file repositories).
2. Click OK.
To set the Perforce client executable path, refer to the Path to P4 command line client executable parameter in the Server Settings.
You can now continue to configure the project.
For All connections – The connection between CxManager Server and the 3rd party repo server is established with the credentials that have been configured for the CxPool IIS Application Pool.
.
Read more: